Showing posts sorted by relevance for query recent comments widget. Sort by date Show all posts

August 25, 2008

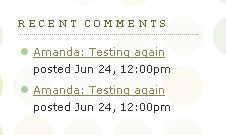
Easy Peasy Recent Comments Widget for Blogger Layouts

As many bloggers have experienced troubles using the original recent comments widget, I've been researching new methods we could use to add this function to our blogs. To my surprise, I realised that we can alter the code of the default Blogger Feed widget to accomodate our need to display recent comments in the layout. By simply manipulating the code, we can create a widget to display the name and a summary/full content of the 5 most recent comments posted to our blogs!


There are several advantages to using this method:
  • Special characters are more likely to be recognized and correctly displayed
  • This method does not rely on externally hosted scripts, which makes the widget load much faster
  • It is much easier to make alterations to the widget
  • Comments are displayed in list format, and can automatically be styled to match the design of your blog.
So far, I have found only two disadvantages to using this method. Firstly, as this is based on a default feed widget, we can only display a maximum of 5 recent comments (the limitation applied by Blogger). Secondly, there is no way to display the title of the post commented on, as this information is not included in the code of the atom.xml feed.

At present, you would need to edit the contents of your Blogger template to add this new version of the "recent comments" widget due to current problems with Blogger's "Add widget" API. As soon as I am able to access the API successfully, I will work on a widget installer which will enable you to add this new widget with ease.

For now, here are the instructions to add this widget to your template by customizing your blog's HTML code.


How to add the new "Recent Comments" widget to your Blogger layout


Step One: Back up your template!


Firstly, you should make a full back-up of your existing template. This will enable you to restore your template to it's original composition if you accidentally make a mistake.

To make a back-up of your blog template, go to Layout>Edit HTML in your Blogger dashboard, and click the "Download full template" link near the top of the page.

This allows you to save a copy of your template to your computer as an XML file. Rename your template to help you find it easily, being sure to retain the ".xml" extension.


Step Two: Add new code to your template

In this step, we will add a complete widget (including the widget template) by adding HTML code.

For this, you will need to access the Edit HTML page for your Blogger template. Do not click the "Expand widget templates" box as this may make it more difficult for you to see where the code should be added.

Using your browser's search function (CTRL+F or CMD+F) locate the following line of code:
<b:section class="sidebar" id="sidebar" preferred="yes">
If you cannot locate this exact section, find a line which begins with <b:section which references the "class" or "ID" of sidebar.

Immediately after this line, paste this entire section of code:

<b:widget id='Feed99' locked='false' title='Recent Comments' type='Feed'>
<b:includable id='main'>
<h2><data:title/></h2>
<div class='widget-content'>
<ul expr:id='data:widget.instanceId + "_feedItemListDisplay"'>
<b:loop values='data:feedData.items' var='i'>
<li>
<a expr:href='data:i.alternate.href'>
<b:if cond='data:showItemAuthor'>
<b:if cond='data:i.author != ""'>
<span class='item-author'>
<data:i.author/> said:
</span>
</b:if>
</b:if>
<span class='item-title'>
<data:i.title/>
</span>
<b:if cond='data:showItemDate'>
<b:if cond='data:i.str_published != ""'>
<span class='item-date'>
 on <data:i.str_published/>
</span>
</b:if>
</b:if>
</a>
</li>
</b:loop>
</ul>
<b:include name='quickedit'/>
</div>
</b:includable>
</b:widget>
<b:widget id='Feed2' locked='false' title='Recent Posts' type='Feed'>
<b:includable id='main'>
<h2><data:title/></h2>
<div class='widget-content'>
<ul expr:id='data:widget.instanceId + "_feedItemListDisplay"'>
<b:loop values='data:feedData.items' var='i'>
<li>
<span class='item-title'>
<a expr:href='data:i.alternate.href'>
<data:i.title/>
</a>
</span>
<b:if cond='data:showItemDate'>
<b:if cond='data:i.str_published != ""'>
<span class='item-date'>
 - <data:i.str_published/>
</span>
</b:if>
</b:if>
<b:if cond='data:showItemAuthor'>
<b:if cond='data:i.author != ""'>
<span class='item-author'>
 - <data:i.author/>
</span>
</b:if>
</b:if>
</li>
</b:loop>
</ul>
<b:include name='quickedit'/>
</div>
</b:includable>
</b:widget>
Then preview your template. If you have made any errors in pasting this section of code, you will notice the error in your preview, or will receive an error message. If this is the case, click the "Clear Edits" link near the bottom of the page to revert your template back to normal, then begin again.

To offer a better understanding of where to paste the above section of code, here is an annotated screenshot:


Once you have correctly pasted this code, save your template. At first you will not be able to see the recent comments widget appear in your blog layout. We need to add the URL for your comments feed and tweak a few options before the widget will appear.


Step 3: Add Comment Feed URL

The final step to adding this new recent comments widget is to add the Feed URL for your comments feed.

To do this, go to Layout>Page Elements where you should see a new "Recent Comments" feed appear at the top of your sidebar.

Click on the "Edit" link for this widget, where you will be presented with the regular pop-up screen for a Feed Widget:


You need to add the URL of your blog's comment feed in the "Feed URL" box.

The default URL for your blog's comment feed will be something like this:


http://yourblog.blogspot.com/feeds/comments/default

Where "yourblog.blogspot.com" is the URL of your blog. If you use a custom domain, change this to the actual URL of your blog. For example, the URL for the Blogger Buster comments feed is http://www.bloggerbuster.com/feeds/comments/default

You should also tick at least the "Item Sources/Authors" box as this field will be used to display the commenter's name.

Optionally, you could also tick the "Item Dates" option if you would prefer to display the date when comments were added.

Once you have added the URL to your comments feed and ticked the appropriate options, click the "Save" button and take a look at your blog. You should now see your new "recent comments" widget appear in your blog layout.

When this widget is installed, you can move it around to a different part of your layout on the Layout>Page Elements page. As each entry of the comments feed is presented as a list item, the widget should take on the appearance of other list-type widgets in your layout.


Comments? Suggestions?

I hope this new version of the recent comments widget will be suitable for most needs and is easy to install in your Blogger template. Please let me know if you experience any problems when using this widget, or if you have any suggestions for how it may be improved, by leaving your comments below.

Initial photo by Rightee (Flickr Creative Commons).

June 24, 2008

Recent Comments for FTP Bloggers

All blogs which are hosted on Blogger publish a comments feed along with their blogs. But those who choose to publish via FTP to their own hosting account are unable to publish a feed for their comments. Update: FTP blogs do publish a comment feed! I have written a separate post about comment feeds for FTP blogs, which includes the URL structure you should use, and also a script which can be used to display recent comments.

Thanks to Pete for this helpful information!

In this post, I'll explain two different methods you could use to display recent comments in your FTP published Blogger blog without accessing the comments feed.

Method 1: Using template tags to display recent comments from the main page


Blogger recommends making use of template tags to display recent comments in the sidebar of Classic templates.

This is not strictly a list of recent comments, as it can only parse and display comments from the page on which it is displayed.

Therefore, on the home page, this code will display comments which are associated with posts displayed on the home page. More recent comments may have been made on previous posts in the archives, but due to the nature of this code, these comments will not be displayed.

If you would like to make use of this method, you can make use of the following section of code:

<MainPage>
<h2 class="sidebar-title">Recent Comments</h2>
<ul>
<Blogger>
<BlogItemCommentsEnabled>
<BlogItemComments>

<li><$BlogCommentAuthor$> //
<a href="<$BlogCommentPermalinkURL$>">
<$BlogCommentDateTime$></a></li>

</BlogItemComments>
</BlogItemCommentsEnabled>
</Blogger>
</ul>
</MainPage>


Paste this code into the sidebar (or other) section of your blog's HTML code, which can be seen in the Template>Edit HTML section of your blog's dashboard.

This will display a list of the names of commenters, followed by the comment permalink.

If you would prefer to also display the body of the comment in this list, you could use the following section of code instead:

<MainPage>
<h2 class="sidebar-title">Recent Comments</h2>
<ul>
<Blogger>
<BlogItemCommentsEnabled>
<BlogItemComments>

<li><$BlogCommentAuthor$> //
<a href="<$BlogCommentPermalinkURL$>">
<$BlogCommentDateTime$></a>
<p class="comment-body">
<$BlogCommentBody$>
</p>
</li>

</BlogItemComments>
</BlogItemCommentsEnabled>
</Blogger>
</ul>
</MainPage>


This will display the commenter's name and comment permalink followed by the entire body of the comment.

Be careful when using this method, as there is no way to display only a summary of the comment. If readers leave rather long comments on your posts, this will take up much space in the sidebar!

Method 2: Using Storago's Recent Comments Service


Storago provides a useful service to display recent comments which will display a true list of recent comments for those publishing by FTP.

This system works by collecting recent comments posted to your blog, and using JavaScript to display them. Storago collects these comments using Blogger's comment notification by email system. You will need to add a unique Storago email address to your comment notification settings for this to work, and it may take a while for the recent comments to begin displaying in your sidebar.

Here's how you can set up the Storago method to display recent comments in your Blogger FTP blog:

Sign up for your free membership to Storago and wait for your welcome email (mine arrived in about 10 seconds, you you shouldn't be waiting too long!) Once this arrives you can validate your membership and log into your account.'

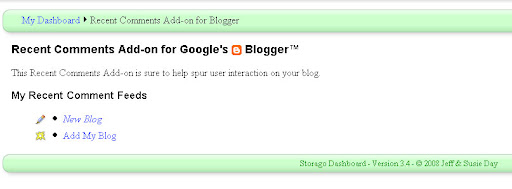
After logging in, you will see a page featuring the tools accessible to you. Choose the "Free recent comments add-on" link.


Then choose to add a new blog.

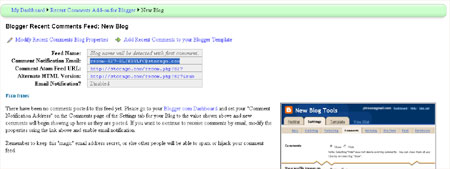
The following page may seem a little confusing as there are no clear instructions of what you should be doing with the information presented:


On this page, you need to copy the "Comment Notification Email" address, which will be something like recom-123-someword@storago.com.

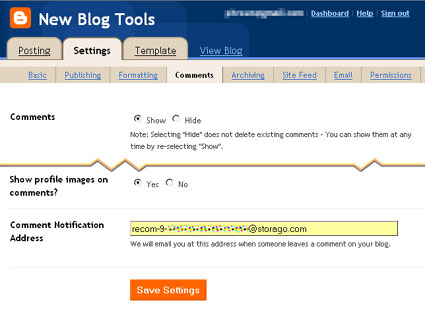
Then go to Settings>Comments in your Blogger dashboard. Add this email address into the comment notification area near the bottom of the page, then save your settings.


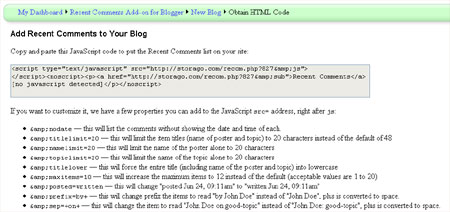
Once you have added the comment notification email address provided by Storago, go back to the Storago page and choose the "Add recent comments to your Blogger template" link. This should bring up a page which looks like this:


You should copy and paste the JavaScript code from inside the gray box into the sidebar section of your blog's HTML code (where you would like this to appear in your design).

By default, the recent comments script is designed to display the commenter's name and the title of the post on which they have commented with the date of the comment beneath.


As far as I can tell, Storago does not allow us to post the body of the comment in the widget. However, we can force the full title and other features by adding code phrases to the JavaScript code (which are detailed on the page where you can find the widget code for Storago).

Comments published on your FTP blog will display in your recent comments widget as soon as they are posted. If you do choose to moderate comments, you will need to approve comments before they are posted in your recent comments widget.

I hope these methods have helped you understand how recent comments may be added to your FTP published Blogger blog without accessing the comments feed.

Please note that this post has now been edited to reflect the information posted by Pete in the comments, and that an update about FTP comment feeds can be read here instead.

July 11, 2007

"Recent comments" widget for Blogger

Blogger Templates have a great "recent comments" widget available which you can use to display recent comments in blog. You can see an example of this in my right sidebar.

To use this widget in your blog, head over to Blogger Templates and choose your options, including the Blog*Spot url of your blog. Click "apply" then "Add widget to my blog".

You will then be taken to your Blogger dashboard where you can automatically insert this widget into your Blogger layout.

If you have a custom domain, you can still use this widget! Simply go to Template>Page elements in your Blogger dashboard and open up the recent comments widget. The code should look like this:

<script style="text/javascript" src="http://giga.ovh.org/rc"></script><script style="text/javascript">var a_rc=3;var m_rc=true;var n_rc=true;var o_rc=100;</script><script src="http://yourblog.blogspot.com/feeds/comments/default?alt=json-in-script&callback=showrecentcomments"></script>
You need to change only the red section of the URL to your custom domain URL (eg: http://www.yourblog.com). Click save and you should then see your recent comments appear.

Technorati Tags: | | |

August 24, 2007

Recent comments widget update! (This works in IE7)

EDIT: You can bow create your own "Recent Comments" widgets using the Recent Comments widget generator here at Blogger Buster.

Since the Recent Comments Widget suddenly stopped working in IE7, I've updated the code and uploaded it to my site in order for us all to continue using it! You can download the new code below. I've tested this in both IE and Firefox and it seems to work just fine (take a look in my right sidebar).

Here's the updated code for the widget which should work fine for all browsers (copy and paste into an HTML/Javascript widget in your blog sidebar):

<script style="text/javascript" src="http://kunoichi.info/blogger_buster/comments.js"></script><script style="text/javascript">var a_rc=3;var m_rc=true;var n_rc=true;var o_rc=100;</script><script src="http://yourblog.blogspot.com/feeds/comments/default?alt=json-in-script&callback=showrecentcomments"></script>
You need to change the portion in red to your own blog address in order for the widget to work.

If anyone has problems using this widget, please let me know!

Technorati Tags: | |

August 28, 2007

Create your own recent comments widgets here!

Since many of you would prefer to have different features for your "Recent Comments" widgets, I've decided to post this widget generator. Using this tool means you can customize your recent posts widget to your personal preferences and then automatically insert the widget into your Blogger blog!

Simply choose your preferences in the boxes below, click "Apply" and then "Add Widget to my Blog" when you are ready. I've tested this in both IE and Firefox and the widgets seem to appear fine.

Customize Recent Comments Widget

http://
(eg: "yourblog.blogspot.com" or "www.yourblog.com")

characters


Please get in touch if you experience any problems using this widget generator. I hope this helps you all customize the widget to your personal preferences!

Technorati Tags: | | |

November 26, 2007

A tabbed navigation widget for your blog (version 1)

To help you streamline the content of your blogs sidebar, I have developed a "tabbed navigation widget" which can include any content you would like to appear in your blog, such as recent posts, recent comments and much more besides.

This is based on Hoctro's original Tab View widget, though this version is much easier to install and allows you to completely customize the widget with your own content. This works by displaying different content within the widget depending on which tab is highlighted, so rather than have a long sidebar full of widgets, you can have them all in one smaller widget so readers will be able to find the information they need more easily.

You can see an example of this widget in action on the Red Web 2.0 demonstration blog. Read on for full instructions and an explanation of how this widget can be customized to suit your needs.

The tabbed navigation widget features tabs and a content window; when clicking on the tabs, different content is visible in the window beneath. My version is a much simplified version of Hoctro's original Tab View widget, and requires that you manually insert the content relative for each tab. This will then allow you to feature any content you wish to appear inside the content window, such as popular posts, an "about this blog" text or a feed of your recent posts/comments.

The basic installation of this widget is quite simple, so you can get this up and running within minutes. However, you must add your own content to this widget, as this version does not support recent posts, recent comments and labels by default. I will explain how to add this content later.

Basic instructions for installing the Tabbed Navigation widget

Here are the basic installation instructions for installing a tabbed navigation widget in your blog. This will get the widget up and running, so you will be able to customize the content afterwards:

  1. First you should make a full backup of your blog template, just in case something goes wrong during the installation and you need to revert back to your original template. To make your template backup, go to Template>Edit HTML in your Blogger dashboard and click on the "Download full template" link near the top of the page.
  2. Next, go to the Edit HTML section of your template and find the closing </head> tag. Just before this tag, paste the following lines of code:
    <link href='http://yui.yahooapis.com/2.3.0/build/tabview/assets/tabview.css' rel='stylesheet' type='text/css'/>

    <link href='http://yui.yahooapis.com/2.3.0/build/tabview/assets/border_tabs.css' rel='stylesheet' type='text/css'/>

    <script src='http://yui.yahooapis.com/2.3.0/build/yahoo-dom-event/yahoo-dom-event.js' type='text/javascript'/>
    <script src='http://yui.yahooapis.com/2.3.0/build/element/element-beta-min.js' type='text/javascript'/>

    <script src='http://yui.yahooapis.com/2.3.0/build/tabview/tabview-min.js' type='text/javascript'/>


    <style type='text/css'>
    .yui-content { padding:1em; /* pad content container */
    }
    .yui-navset .yui-content {
    border:1px solid #ccc;
    }
    .yui-navset .yui-nav .selected a, .yui-navset .yui-nav a:hover {
    background-color:#fff;
    }
    .yui-navset .yui-nav li a {
    background:#e5e5e5 url(http://developer.yahoo.com/yui/examples/tabview/img/round_4px_trans_gray.gif) no-repeat;
    }
    .yui-navset .yui-nav li a em {
    background:transparent url(http://developer.yahoo.com/yui/examples/tabview/img/round_4px_trans_gray.gif) no-repeat top right;
    padding:0.5em;
    }
    /* top oriented */
    .yui-navset-top .yui-nav { margin-bottom:-21px; } /* for overlap, based on content border-width */
    .yui-navset-top .yui-nav li a {
    border-bottom:1px solid #ccc;
    }
    .yui-navset-top .yui-nav .selected a { border-bottom:0; }
    .yui-navset-top .yui-nav .selected a em { padding-bottom:0.6em; } /* adjust height */
    </style>
    This code features the CSS styling and javascript calls required to operate this widget correctly in your template. Once you have added this code, simply save your template.
  3. Next, go to the Page Elements section of your dashboard (Template>Page Elements). Choose to add a new HTML/Javascript widget in your blog sidebar, and in this widget, paste the following section of code:
    <div id="demo" class="yui-navset">
    <ul class="yui-nav">
    <li><a href="#tab1"><em>Tab1</em></a></li>
    <li class="selected"><a href="#tab2"><em>Tab2</em></a></li>
    <li><a href="#tab3"><em>Tab3</em></a></li>
    </ul><br/>
    <div class="yui-content">

    <div id="tab1"><p>Tab One Content</p></div>
    <div id="tab2"><p>Tab Two Content</p></div>
    <div id="tab3"><p>Tab Three Content</p></div>
    </div>
    </div>
    <script>
    (function() {
    var tabView = new YAHOO.widget.TabView('demo');

    YAHOO.log("The example has finished loading; as you interact with it, you'll see log messages appearing here.", "info", "example");
    })();
    </script>
    Save your widget and take a look at your blog. The resulting widget should something like this: Now you will be able to customize the widget to suit your needs.

Adding content to the Tabbed Navigation widget

If you take a look at the code for the widget content above, you will notice that I have highlighted the text of the tabs in blue and the content which appears in the box below the tabs in red. This is help you understand how to customize this widget with your own titles and content.

Notice the relationship between the tab titles and their content, so when you click on "tab 1" for example, the related content for this tab will appear in the window below the tabs.

You can change the titles of the tabs and add whatever content you like to the widget, including Javascript code. Here are a few examples of content you could use in the widget, with examples for implementation:

  • An About This Blog text:
    This is the easiest type of content to add. Simply replace the blue title (eg: Tab1) with an appropriate title, like this:
    <li><a href="#tab1"><em>Tab1</em></a></li> becomes <li><a href="#tab1"><em>About this blog</em></a></li>

    Then add your content in place of the "tab content" text, for example:
    <div id="tab1"><p>Tab One Content</p></div>

    becomes

    <div id="tab1"><p>This is a piece of text about your blog. You can write whatever you want here</p></div>
  • Add a feed of your recent posts or comments
    This is a little more complicated as you cannot simply add a feed widget into the existing Tabbed navigation widget. Instead you could use the Blog Headlines widget from the tools section to create an independent blog feed widget which uses only javascript code to display recent posts or comments. In this case you would paste the javascript code in place of the content as demonstrated below:
    <div id="tab1"><p>Tab Two Content</p></div>

    becomes <div id="tab1"><p><script language="JavaScript" src="http://tools.bloggerbuster.com/headlines/feed2js.php?src=http%3A%2F%2Fwww.bloggerbuster.com%2Ffeeds%2Fposts%2Fdefault&num=3" type="text/javascript"></script> <noscript> <a href="http://tools.bloggerbuster.com/headlines/feed2js.php?src=http%3A%2F%2Fwww.bloggerbuster.com%2Ffeeds%2Fposts%2Fdefault&num=3&html=y">View RSS feed</a> </noscript> </p></div>
    If you like, you can even use the code above as long as you change the url to match that of your blog.
  • Add a list of your labels/blogroll/favorite posts:
    You can manually add a list or links to your labels/blogroll/favorite posts by pasting the HTML code into the content section too. Simply paste the HTML code to display these links in the following format:
    <ul><li><a href="http://yourblog.blogspot.com/search/label/yourlabel/">Your Label/Link text</a></li></ul>
    Here is an example of what this code would look like when pasted into the content section for your tabbed navigation widget:
    <div id="tab3"><p> <ul> <li><a href="http://linkone.com">link one</a></li> <li><a href="http://linktwo.com">link two</a></li> <li><a href="http://linkthree.com">link three</a></li> </ul> </p></div>

Limitations of the Tabbed Navigation widget

It is very difficult to automatically display links to the archives or labels of your blog within this Tabbed Navigation widget. This is because the code used to display these items in regular Blogger widgets will only work if the widget type matches the content to be displayed (for example, Archives can only be displayed when the widget type is "archives"). So when using this widget, you would need to create manual links to your archives or labels in order to make them display inside your widget's content section.

However, I have been experimenting with this widget, and have discovered a way of displaying either the archives or labels within the widget. Unfortunately though, this means that the widget becomes more complicated to install, and is not so easily adjusted after the initial installation. If anyone does know of a method for displaying archives and labels which does not rely on the widget type, I would love to hear how this could be achieved!

In the next few days, I will post version two of the Tabbed Navigation widget which by default will feature a tab for the archives of your blog. As I mentioned, this will be a little more complicated to install, and any post-installation customizations would need to be made from within the Edit HTML section of your blog rather than within the layouts section.

I hope you have found this (rather long) tutorial useful and easy to understand. If you have any comments or questions, please feel free to leave these below.

Technorati Tags: | | | | |

November 14, 2007

Using a "Tab View" widget to streamline content

Highlighting your recent posts, comments and label feeds is a great way of ensuring readers will stay on your blog for a longer period of time. However, featuring too much content in your sidebar or above the main posts column can often make your blog appear cluttered.

A more streamlined method for presenting such content is to use a tabbed navigation widget, like this:

This widget was designed by Hoctro, and uses JSON calls to gather recent posts, recent comments and labels feeds from your blog. Once installed, readers can click on a tab and the relevant content will appear in the section beneath.

Hoctro's Tab View widget ensures that your readers can easily access other areas of interest in your blog: when the tab labels are clicked, the section beneath is updated with relevant lists of posts or comments so your readers can easily navigate to other areas of your blog. This widget is based on the Yahoo! TabView application, and uses Javascript to call the clickable titles of recent posts, comments and label feeds which are quickly loaded into the space beneath the tabs.

To install this widget in your own blog, head on over to Hoctro's Place where you will find full instructions and all the code required for the Tab View widget to work. There are no externally hosted files for this widget, as all of the code is provided for you to paste into your template.

At first glance, the array of code may seem confusing, so to make this easier to understand, I will outline the five steps for installation here:

How to install Hoctro's Tab View Widget

  1. Back up your blog template by going to Template>Edit HTML and clicking on the "Download full template" link.
  2. Install the latest version of Hoctro's Javascript core library: This is a large portion of code which you need to copy and paste just before the closing </head> tag in your blog's template.
  3. Install the Yahoo! Tab View requirements: This portion of code can be found on the Tab View widget page, and should be pasted immediately after the Javascript core library, but before the closing </head> tag.
  4. Install the Tab View widget code: Again, this portion of code can be found on the Tab View Widget page in Hoctro's blog. Paste this whole section of code between any two <b:section> and </b:section> tags in your template (for example, in the sidebar section). It is easiest to do this while the widget templates are not expanded, to make it easier for you to locate the correct area in which to paste the code.
  5. Finally, you will need to change the title of the widget, the labels and the URL of your blog:
    • For the labels, ensure the labels match the exact label names of your own blog's labels. These are case sensitive, so ensure you use the same uppercase or lowercase labels as appear in your own blog.
    • For your blog's url, simply enter your blog URL without the "http://" part. For example: yourblog.blogspot.com or www.yourblog.com
    Then save your template and take a look at your new Tabs View widget!

You can easily move the position of the widget simply by moving it in the Layout section of your Blogger dashboard. I feel the optimum place for this widget is above the main posts section, or as an extra element in the header. I did experiment with this in a widened sidebar, but the space was simply not wide enough for the five tabs to be presented well (although this did still work as it was intended!).

While I have found Hoctro's Tab View to be a very useful widget, I would prefer to be able to customize such a widget with different content, such as "Popular Posts", Archives and "Featured Posts". Currently I am working on a modification of the original Yahoo! TabView application, which can be installed directly into an HTML/Javascript widget. Although this widget will require more customization to suit your individual blog and preferences, it will be much easier to modify after the initial installation. I hope to be able to post a full tutorial and installation guide for this by the weekend once I've perfected the style of the tabs.

I hope this post has been useful in explaining the use and benefits of the Tab View widget. Please feel free to leave your comments and suggestions below.

June 27, 2008

Update: FTP Blogs do publish comment feeds!

While researching for my previous post, Recent Comments for FTP Bloggers, I had been unable to locate the comments feed for FTP published blogs (and had wrongly assumed that such blogs didn't publish a comments feed!). Luckily, Pete has confirmed that FTP blogs do publish comment feeds! The URL structure of the feed location is as follows:
http://blogger.com/feeds/[blog-id-number]/comments/default
Where [blog-id-number] is the unique identifier for your blog. To find your unique blog ID number, simply log in to Blogger and access the dashboard for your FTP published blog. You can then locate your blog ID by looking in the address bar, where your blog ID will be the long numeric string at the end of the URL: Copy this number, and replace [your-blog-id] with this number instead. The URL for your FTP blog's comment feed will then be structured like this instead:
http://blogger.com/feeds/8351217949706258294/comments/default
You can use the URL for your comment feed to enable a link for subscribers; to syndicate through Feedburner, or simply to provide a list of recent comments which is drawn from your comments feed.

How to publish recent comments from your FTP blog's comment feed

If you would like to display a list of recent comments in a similar manner to this widget's display, you can use paste the following code into your blog template (be sure to change [your-blog-id] to your unique ID number!): <script style="text/javascript" src="http://bloggerbuster.com/scripts/comments.js"></script><script style="text/javascript">var a_rc=5;var m_rc=true;var n_rc=true;var o_rc=100;</script> <script src="http://blogger.com/feeds/[your-blog-id]/comments/default?alt=json-in-script&callback=showrecentcomments"&gt;</script> By default, this script will display the 5 most recent comments, with a 100 character excerpt from each comment. If you prefer to display more (or less) than 5 recent comments, you should edit this phrase in the code, replacing "5" with the number of comments you prefer to show:
var a_rc=5;
If you would prefer to show more (or less) of an excerpt for each comment, you should edit this phrase and replace "100" with the number of characters to display:
var o_rc=100;
Note: to display no excerpt at all, you can simply replace "100" with "0". I hope this update has provided useful information for those publishing their Blogger blogs via FTP. Please accept my apologies for assuming FTP blogs didn't publish comment feeds! Many thanks go out to Pete for his helpful comment and information.

July 30, 2008

Recent Posts Widget for Blogger

Many Bloggers use a Feed widget to display links to recent blog posts. However, when using this widget, we are limited to display only 5 items or less.

So I have created a widget which allows you to display more than 5 recent posts. You can customize the title and choose how many posts you would like to display, then install directly to your blog at the click of a button!

To install your own recent comments widget in your Blogger layout, simply follow these steps:


  1. Choose a title for your widget, or leave this blank if you prefer not to display a title.

  2. Add your blog's URL in the box provided. Do NOT add the HTTP:// part, or a closing forward slash as these are already generated by the script.

    For example, you can enter yourblog.blogspot.com or www.yourblog.com in the blog URL text box.

    However, http://yourblog.blogspot.com or www.yourblog.com/ will not work!

  3. Choose how many post titles you would like to display. This is set to 10 by default, though I have successfully experimented with up to 100!

  4. Click on the "Customize" button to save your changes, then the "Add to Blog" button will be highlighted. You can then click this button to add your customized recent posts widget to your Blogger blog.
Here is the widget installer to add your recent posts widget to your blog:


How this works

This widget references a JavaScript which parses your blog's feed and displays the titles of the most recent posts in a list.

Unfortunately the script I am using causes problems when trying to display a summary of latest posts, so at present I am unable to offer this feature.

Let me know what you think!

I hope you enjoy using this widget! Please let me know your thoughts on this by leaving your comments below.

June 01, 2008

Complete List of Blogger Widgets

Here is a list of useful widgets which you can install to your Blogger layout directly from this site:

This list will be updated with new widgets as they are created.

To discover even more widgets, scripts and add-ons available to Blogger users, have a read through the Widgets and Add-ons section of this site.

If you have any ideas for other useful widgets, please let me know by leaving a comment below, or adding this suggestion to the Skribit widget (bottom of the sidebar) for others to vote on too.

August 19, 2008

Blogger Widget Problem (sectionID error) and a temporary workaround

As many of you have expressed in your comments and emails, there seems to be an issue with installing widgets using the Blogger Widget API (widget installers).

From what I have read in various forums all widget installers are affected by this, including even the Feedburner widget to add an email form or blog list to a Blogger blog.

As yet, I'm unable to devise a solution for this problem, but I can offer a workaround for those who need to add a new widget to their layout. Here are the details of the problem and a temporary solution until the issue is resolved.


The issue with adding widgets to Blogger layouts

Many of us have been experiencing problems when trying to add a widget using a third party "widget installer" such as the recent comments widget, Feedburner's email subscriptions code and even Amazon widgets.

We are able to follow any steps nescessary to add the widget to our blogs until we are redirected to Blogger's "Add a new widget" page, where we can customize the title, content and choose the blog where the widget will be installed.

At present, clicking the "Add widget to your blog" link results in a screen like this:


The top half of the screen explains that there is a missing required field in the form used to add the widget to our blog:

We're sorry, but we were unable to complete your request.

The following errors were found:

sectionId: Required field must not be blank
While the lower half includes a bX error code.

It seems that the API for adding new widgets may either be in the process of an update or has a temporary error as everything up to this point seems to be working fine.

There are already several threads in the Blogger help group regarding this issue and many of us are trying to work out a solution to the problem.

I will of course update this post when the problem is resolved or when we have discovered a working solution, but in the meantime we can use a temporary workaround.

A temporary work-around for the problem adding third party widgets

As far as I can tell, the API for adding new widgets works just fine up until the point of adding to a specific blog.

This means that when we arrive at the "Add Page Element" page, the code included in the "Edit Content" section should already be configured and suitable for our needs.


If you click the "Edit Content" link on the "Add Page Element" page, this will reveal the code which should be added as the widget content.


You can then copy this code to your clipboard, and paste inside a regular HTML/JavaScript gadget through the Layout>Page Elements page in your regular Blogger dashboard.

While this will take longer (and is certainly more troublesome) than the regular method to add a new widget, it is certainly preferable to being unable to add a new gadget at all!

Your thoughts on the problem?

If you have any suggestions or know of a solution we could use for the widget installation problem, please let us know about this by leaving a comment or sending me an email.

Once this issue is resolved or documented further, I will be sure to update this post with the new information so we can begin using (and developing) widgets for our Blogger blogs!

April 19, 2008

Complete List of Blogger Tutorials

Here is a complete list of all the tutorials posted on Blogger Buster, organized by category. So please, dive in and read the tutorials which are most useful to you!

Categories

Click on a category heading to skip to this section of the article.

Back to Top

Blogger News and Issues

This section features important news and tutorials relating to your use of Blogger.com.

Back to Top

Custom Domains

This section features tutorials in regard to using Blogger's "custom domains" service.

Back to Top

Customizing your Blogger Template

This section features all the articles I have written with regard to customizing your Blogger templates.

I have further divided this category to help you easily find a particular customization for your needs.

Overall Layout/General Customizations

Here you will find links to posts which discuss general/overall aspects of customizing your Blogger template.

Back to Top

Header/Navigation

These tutorials can help you develop the header and navigational areas of your Blogger template.

Back to Top

Posts

Here you can find links to articles which discuss styling of the main posts area, including the comments and post-footer sections.

Back to Top

Sidebar(s)

These articles have particular relevance to designing your sidebar(s)

Back to Top

Footer Section

This section focuses on customizations for the footer section of your blog.

Back to Top

Feeds and Syndication

These articles discuss your blog feeds and blog syndication.

Back to Top

General Tutorials

This section features general articles of interest

Back to Top

Images, Icons and Badges

Here you will find articles regarding the use if imagery in your Blogger template and posts.

Back to Top

Labels Categories and Tags

This section contains articles discussing the use of labels, categories and tags in Blogger blogs.

Back to Top

Monetize your Blog

These posts feature information about adding advertisements or using Google Adsense in regard to your Blogger blog.

Back to Top

Resources for Bloggers

Here are posts discussing useful resources for bloggers.

Back to Top

SEO and Blog Traffic

This category features posts which discuss search engine optimization (SEO) and generating blog traffic.

Back to Top

Widgets and Add-Ons

Here are articles featuring widgets and add-ons which you can use to add functionality to your Blogger blogs.

Back to Top

Updates

This list will be updated periodically with new articles as they are published on the site. You may also be interested in subscribing to Blogger Buster to receive updates and news articles as they are posted.

I'm always open to suggestions for future articles, so if you have an idea for an article you would like to see published here, feel free to drop me a line.

May 17, 2008

How to Install Intense Debate Comments in Blogger Blogs

Intense Debate is a commenting system which is designed to inspire conversation. Including such features as threaded comments (allowing readers to reply to each other in comment threads), avatars and a voting system, many Blogger users are now choosing this as an alternative to the default Blogger commenting system.

Many readers have requested a tutorial about installing and using Intense Debate. So in this post I'll explain exactly what this new service has to offer, and how easily this can be installed in your Blogger powered blogs (including some troubleshooting tips to make sure everything runs smoothly!)

What Are the Main Features of Intense Debate?

Intense Debate is a fully featured commenting system which provides many more features than Blogger's standard comments, including:

  • Comment form beneath posts (on the same page)
  • Threaded comments, which allow commenters to reply directly to each other and be visible as a comment "heirachy"
  • Comment avatars (of registered Intense Debate members)
  • The ability to vote comments up/down (so the most popular comments can float to the top of the list)
  • Profiles for registered members, which include links to members' blogs and social media profiles
  • Widgets for top commenters and recent comments which you can add to your Blogger layout with ease

You can read about these features in full detail, or watch the two minute video of Intense Debate functionality which explains this service in a snap!

How to Install Intense Debate in your Blogger Blog

It is surprisingly easy to install Intense Debate commenting in your Blogger template! Even when I tried this method for non-standard and highly customized templates, I found this method worked just fine.

If you would like to use Intense Debate as an alternative to Blogger's commenting system, here is what you should do:

  1. Head over to the Intense Debate home page and add your blog's URL in the box provided. Then click on the Install Intense Debate" button:

  2. If your blog is hosted on Blogspot (eg: yourblog.blogspot.com), Intense Debate will automatically detect your blogging platform.

    If you use a custom domain (eg: www.yourblog.com), you will need to choose Blogger as your blogging platform.

    Once Intense Debate is sure of the platform you are using, you will see a screen like this:


    Here you have the choice of installing Intense Debate comments as a widget (the easy method) or directly in your Blogger template, to appear below your posts (the recommended method).

    If you choose to add this as a widget, simply click on this option and follow the steps to add this as a widget in your blog sidebar.

    If you would prefer to use the full commenting system, continue reading instead!
  3. Installing the full Intense Debate commenting system really is a breeze! In this case, you will need to follow the steps provided on the installation page to make a back-up of your full Blogger template by going to Layout>Edit HTML in your Blogger dashboard, and clicking on the "Download full template" link.

    This saves a copy of your existing blog template (including any widgets and customizations) to your computer.

    Once you have done this, go back to the Intense Debate installation screen and click the "Browse" button to locate your template file on your computer.
  4. Next, you have a decision to make: you can either:
    • Choose to install Intense Debate on posts where there are no existing comments
    • Choose to replace all comments with Intense Debate comments instead.
    If you do choose to replace all comments, these existing comments will not be lost! You can retrieve and import these to Intense Debate afterwards if you choose to do so (as shall be explained shortly).

    Check the radio selection for the option you prefer, then click the "Upload file and continue" button.
  5. On this next screen, you will see a box filled with code. This is your Blogger template code which has been modified to include the Intense Debate commenting system.

    Copy all of the code in this box to your clipboard. Then go to Layout>Edit HTML in your Blogger dashboard.
  6. Replace all of your existing template code with this modified code from Intense Debate.

    You can check that you have installed this correctly by previewing your changes. If the installation was successful, you will receive no error notifications and can proceed to save your template.
  7. Finally, click on the "Finish" button right near the bottom of the Intense Debate installation page. Then visit your blog in your web browser to check out your new commenting system!

Changing the Comment Settings

Once you have installed Intense Debate comments in your Blogger blog, you may like to change some of the settings to suit your individual requirements.

To change your Intense Debate settings, you will need to access your Intense Debate dashboard and click on the "settings" link for the blog you wish to access.

Here are the different comment settings you can change to suit your needs:

  • Blog Info: Here you can alter any details for your blog, such as the URL, blog title and RSS feed.
  • Comment Posting: This section includes any moderation opions you may wish to alter. You can choose to moderate all comments before they appear beneath your blog posts; moderate posts containing words in a blacklist, and even automatically delete comments if they contain certain "banned" words and phrases.
  • Email Notifications: Choose whether you would like an email to be sent to blog authors whenever a new comment is posted (similar to Blogger's comment settings).
  • Display Settings: If you would like to enable "threads" (this allows a person to comment directly to another commenter), tick the appropriate box. You can also set the default order of comments (readers will be able to re-order this list for themselves if they choose).
  • Comment Link Text: In this section you can choose to alter the text used for your comment links. By default this is set to Comments ([#]) where [#] is the number of comments. You could change this to "[#] Responses", "Observations: ([#])" or indeed any other link text which you prefer!
  • Add another blog admin: This setting allows you to add new moderators who can access your Intense Debate settings, which is useful for group bloggers.

Changing the Appearance of your Intense Debate Comments

When you first install Intense Debate comments, you will notice the color scheme and fonts match those already present in your template! This is lucky since Intense Debate do not recommend that you alter the CSS for your comments (this is still in beta, the code used may alter and render such changes invalid).

There are however a few changes you can make from within your Intense Debate dashboard. To access these layout settings, go to your Intense Debate dashboard and click on the "Layout" link for the blog layout you wish to alter.

From this page, you will be able to alter the following settings:

  • Comment Size: This setting means you can alter the avatar and font size for each comment as "compact", "normal" or "large".
  • Button Style: This affects how links to "post a comment", "post-reply" and "submit" are displayed in your comment section. Choose from either a button or text link style (which appear like normal links in your posts)
  • Comment Layout: This option enables you to change how comments appear beneath your posts. The default setting is for comments to be permanantly displayed beneath each post. Alternatives include "peekaboo comments" (activated by clicking on the comment link), and comments in a pop-up page.

    Most bloggers choose the default (comments already present beneath posts) setting, which is also my personal preference as clicking on a link adds another step for readers and offers less incentive for actually leaving a comment on your posts.

One thing you may notice on the layout page is that "Chameleon" is the only choice of style for your Intense Debate comments, though there is an image which suggests other styles may become available soon:

Import Existing Comments from Blogger

If you choose to install Intense Debate for all your existing blog posts (including those posts which already have comments) you may prefer to import any existing comments from Blogger to be displayed alongside your new Intense Debate comments.

Importing your old comments is very easy. Simply go to your Intense Debate dashboard and click on "Overview" for the blog whose comments you wish to import.

Next click on the "Blog Tools", then on the "Import Comments" link in the left hand column.

On this page, you will be prompted to log in to your Blogger account, which will allow Intense Debate to access the API for importing your comments. Once logged in, you will be able to choose which blog you wish to import from and to (be sure to import/export comments from the same blog, otherwise Intense Debate will not be able to allocate them to the correct posts!).

When you choose to import these comments from Blogger, the existing comments will not be deleted! If you decide to uninstall Intense Debate for any reason, you can export all your Intense Debate comments to an XML file, and restore the view of your existing Blogger comments.

I'm not sure that it's possible to export Intense Debate comments back to Blogger at this time as Blogger's API does not allow comments to be automatically created using such third party software (though I strongly suspect it may be possible for respected services like Intense Debate to do this in the future).

Manage your Intense Debate Profile

One of the more useful functions of Intense Debate is profiling. By using your Intense Debate profile to leave comments on ID-enabled blogs, you can increase your reputation, link to your other social networking profiles, add an avatar and monitor comments left on all blogs you visit!

Readers can vote comments up or down (depending on their perceived value to the conversation). Comments which are voted up increase that commenters reputation (whilst the reverse also applies too).

Troubleshooting Intense Debate Installations

From my experiences is using Intense Debate so far, I am happy to say that there are very few possible problems which could occur.

While testing Intense Debate installation with both default and heavily customized (third party) Blogger templates, I have only found two possible problems which may occur during installation: imported comments may not appear as soon as they are imported, and the comment count on heavily customized templates may not appear.

Both of these can usually be resolved easily using the following methods:

Imported comments do not appear

First of all, check the comments in your Intense Debate dashboard to ensure these do appear for the appropriate blog (if not, you should attempt to import them again).

If the imported comments are present, chances are that Intense Debate has not caught up with these comments yet. Be patient, and soon enough you should notice these comments appear in the Intense Debate comment area beneath your posts.

If after a day or so the imported comments do not appear, you should ask for help in the forum. This forum is watched by members of the Intense Debate team who seem very helpful and will be able to help you resolve this problem quickly.

The comment count does not update

I've only ever noticed this problem occur in heavily customized templates where the comment count appears near the top of each post, rather than in the post-footer section.

I suspect this problem may occur because the comment-link tags is separated from other elements of the comments section, and is not parsed correctly by Intense Debates (otherwise flawless) installation system.

The fix for this problem is a little more complicated, but not too difficult.

Depending on whether you have chosen to replace all comments with Intense Debate, or only the posts which do not already have comments, you should use one of the following methods to solve this:

  • If you have chosen to replace only posts which don't already have comments:

    Firstly, backup your existing template code (to ensure you can restore your template if thhere are any problems).

    Find this section of code in your Blogger template:
    <a class='comment-link' expr:href='data:post.addCommentUrl' expr:onclick='data:post.addCommentOnclick'><data:top.commentLabel/> <b:if cond='data:post.numComments == 1'>(1) <b:else/>(<data:post.numComments/>) </b:if></a>
    Check that this section of code is not surrounded by Intense Debate HTML comments, which appear like this:
    <!-- Intense Debate -->

    <!-- /Intense Debate -->
    If these comments do not appear around this section of code, replace the code with the following instead:
    <!--Intense Debate--> <b:if cond='data:post.numComments == 0'> <div expr:id='"IDCommentPostInfoTitle"+data:post.id' style='display:none'><data:post.title/></div> <div style='display:none' expr:id='"IDCommentPostInfoTime"+data:post.id'><data:post.timestampISO8601/></div><div style='display:none' expr:id='"IDCommentPostInfoAuthor"+data:post.id'><data:post.author/></div><div style='display:none' expr:id='"IDCommentPostInfoCats"+data:post.id'><b:if cond='data:post.labels'><b:loop values='data:post.labels' var='label'><data:label.name/>|</b:loop></b:if></div> <a expr:href="data:post.url" expr:name="data:post.id" class="IDCommentsReplace">Comments</a> <b:else/> <!--/Intense Debate--> <a class='comment-link' expr:href='data:post.addCommentUrl' expr:onclick='data:post.addCommentOnclick'><b:if cond='data:post.numComments == 1'>1 <data:top.commentLabel/><b:else/><data:post.numComments/> <data:top.commentLabelPlural/></b:if></a> <!--Intense Debate--> </b:if> <!--/Intense Debate-->


    Finally, save your template. If this was successful, you should see the comment count appear on your posts which relates to the true number of comments (whether Intense Debate or Blogger generated comments).
  • If you have chosen to replace all comments with Intense Debate:

    Again, backup your existing template to restore if there are problems using this method.

    Find the following section of code in your template and ensure it is not surrounded by the Intense Debate HTML comments:
    <a class='comment-link' expr:href='data:post.addCommentUrl' expr:onclick='data:post.addCommentOnclick'><data:top.commentLabel/> <b:if cond='data:post.numComments == 1'>(1) <b:else/>(<data:post.numComments/>) </b:if></a>
    Providing this section is not surrounded by the Intense Debate HTML comments, replace this section with the following code:
    <!--Intense Debate--> <div expr:id='&quot;IDCommentPostInfoTitle&quot;+data:post.id' style='display:none'><data:post.title/></div> <div expr:id='&quot;IDCommentPostInfoTime&quot;+data:post.id' style='display:none'><data:post.timestampISO8601/></div><div expr:id='&quot;IDCommentPostInfoAuthor&quot;+data:post.id' style='display:none'><data:post.author/></div><div expr:id='&quot;IDCommentPostInfoCats&quot;+data:post.id' style='display:none'><b:if cond='data:post.labels'><b:loop values='data:post.labels' var='label'><data:label.name/>|</b:loop></b:if></div><a class='IDCommentsReplace' expr:href='data:post.url' expr:name='data:post.id'>Comments</a>

    <!--/Intense Debate--> <!--Intense Debate-PRE ID <a class='comment-link' expr:href='data:post.addCommentUrl' expr:onclick='data:post.addCommentOnclick'><data:top.commentLabel/> <b:if cond='data:post.numComments == 1'>(1) <b:else/>(<data:post.numComments/>) </b:if></a> -->


    Then save your template and check to make sure the comment count appears in your blog posts.

If you are still experiencing problems with your Intense Debate comments, the best advice I can offer is to visit the forums where members of the Intense Debate team will be on hand to assist you with your problems.

Over to you!

Do you already use Intense Debate? Or are you considering using this free service as an alternative to Blogger's default commenting system?

If so, please let us know your own opinions of Intense Debate comments by leaving your comments below.

Advertise on Blogger Buster

Browse through the Archives

All existing posts are still available to view while I'm working on the site, albeit seen in a much simpler interface. Feel free to browse through the archives to find tutorials, templates and articles to help you build a better blog:

© Blogger Buster 2010 Home | About | Contact | Hire Me | Privacy Policy